
Call settings
The Settings panel controls how your CTI behaves during calls: auto answer, forwarding, offline routing number, and panel and notification preferences.
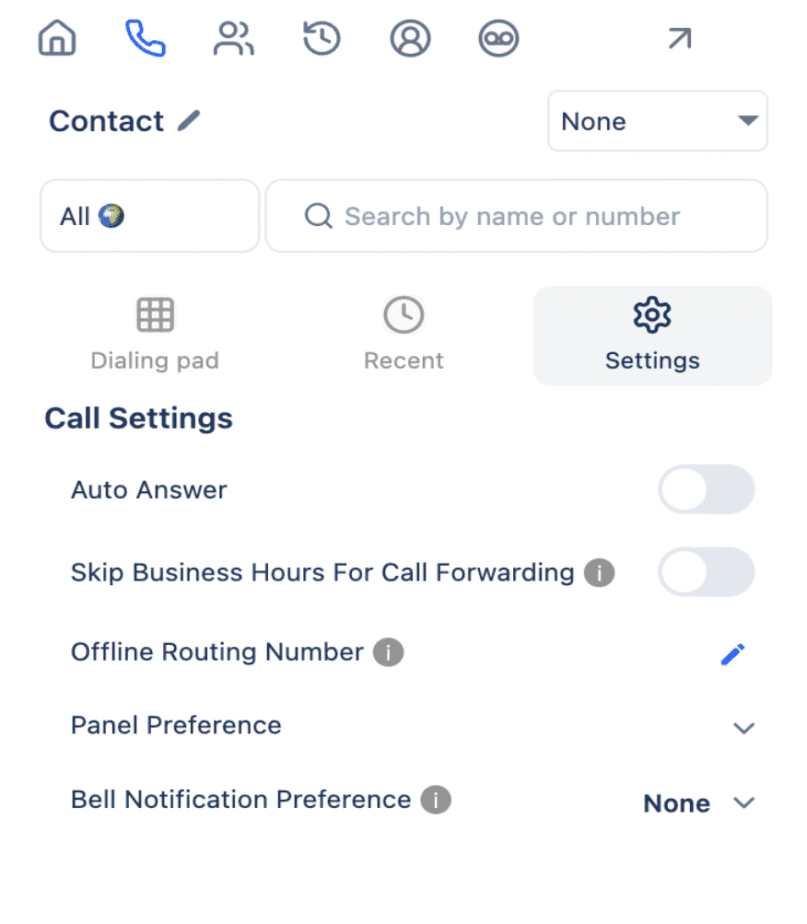
Auto answer
Automatically answers incoming calls on your behalf.
Choose ON if you:
- Want calls to connect instantly without manual clicking.
- Handle a large volume of calls and prefer a quick response time.
- Are part of an active call queue setup.
Keep it OFF if you:
- Prefer to manually pick which calls to answer.
- Need time to prepare before taking a call.
How to use:
- Find the Auto Answer toggle.
- Switch it ON to enable automatic answering.
- Switch it OFF to answer calls manually.
Tip: Make sure your headset or audio device is connected before enabling Auto Answer.
Skip business hours for call forwarding
Allows your calls to be forwarded even outside your business hours.
Turn ON if you:
- Want to receive calls after office hours.
- Have a 24/7 support setup or are part of an on-call rotation.
Turn OFF if you:
- Only want calls to forward during standard business hours.
- Do not want to be disturbed outside your schedule.
How to use:
- Locate the Skip Business Hours for Call Forwarding switch.
- Turn it ON or OFF based on your working hours preference.
Offline routing number
Lets you define a phone number where calls are routed when you are offline.
Use this feature if you:
- Want calls to reach your mobile number or another team when you are not logged in.
- Have backup agents or voicemail systems outside of Salesforce.
Leave it empty if you do not want calls forwarded when offline.
How to use:
- Click the pencil icon next to the Offline Routing Number field.
- Enter the number where calls should be routed when you are unavailable.
- Press Enter to save automatically.
Example: +1 555-123-4567 (include country code)Panel preference
Selects which panel appears first when you open your CTI component.
- None: you do not want any panel to open automatically.
- Logs: you mainly monitor or review past call logs.
- Conference: you frequently host or join conference calls.
- Related List: you want to see records linked to calls by default.
- Link Records: you often link calls to Salesforce records manually.
- Tags: you organize calls with labels or tags.
- SMS: you use text-based communication frequently.
- Feedback: you gather feedback after each call.
- Call Summary: you want to see a summary of recent calls first.
- Bell Notification Preference: you want quick access to your notification settings.
How to use:
- Click the Panel Preference dropdown.
- Choose your preferred section.
- Your choice saves automatically.
Bell notification preference
Controls how you receive alerts for new calls or messages.
- None: no notifications. Ideal for focused work or silent mode.
- No Answer: get notified only when a call is not answered. Good for supervisors tracking missed calls.
- Busy: get alerts when your line is busy. Good for monitoring active sessions.
- Both: get all alerts. Ideal if you manage multiple calls or a team.
How to use:
- Click the Bell Notification Preference dropdown.
- Select your preferred alert mode.
- The update saves automatically.
Tip: Choose None or Silent when in meetings or if you prefer no sound alerts. All updates save automatically, with no extra clicks needed.