Subscription purchase & management guide
This guide shows you how to buy subscriptions, distribute licenses among users, and handle plan changes through the app's built-in Stripe payment system.
Step 1: Open the Buy License page
- Select the Buy License icon from the left sidebar.
- Navigate to the Plans tab to view all available subscription options.

- Choose:
- The desired plan for purchase.
- Number of licenses/subscriptions needed.
- When prompted, select your billing preference:
- Monthly option.
- Yearly option.
- Click Buy to proceed.
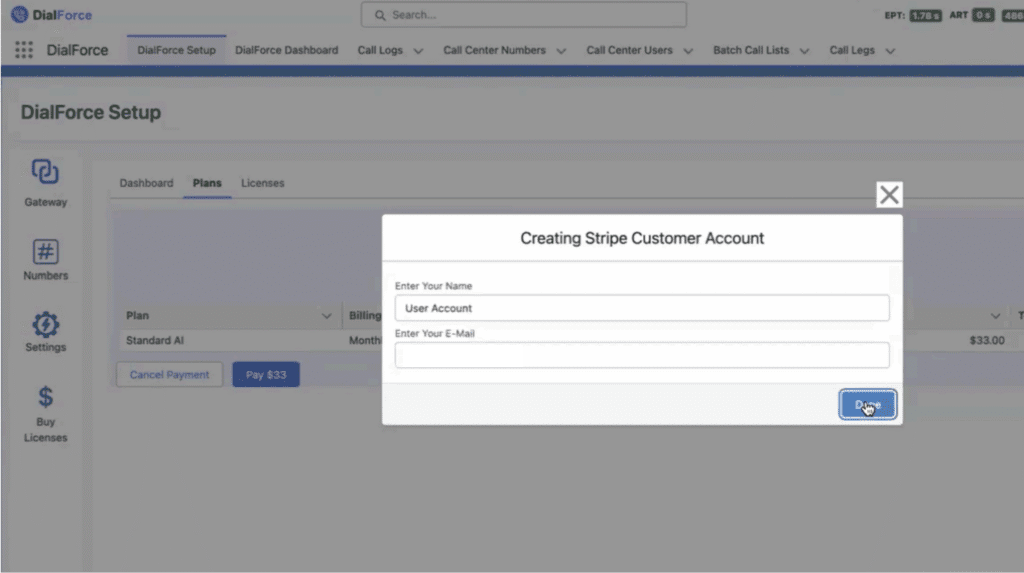
Step 2: Stripe account creation
The system verifies whether your organization maintains an existing Stripe Customer ID. If no Stripe account exists:
- A pop-up form requests your Name and Email Address.
- Complete the fields and click Done.
- The system automatically generates a Stripe account for your organization.
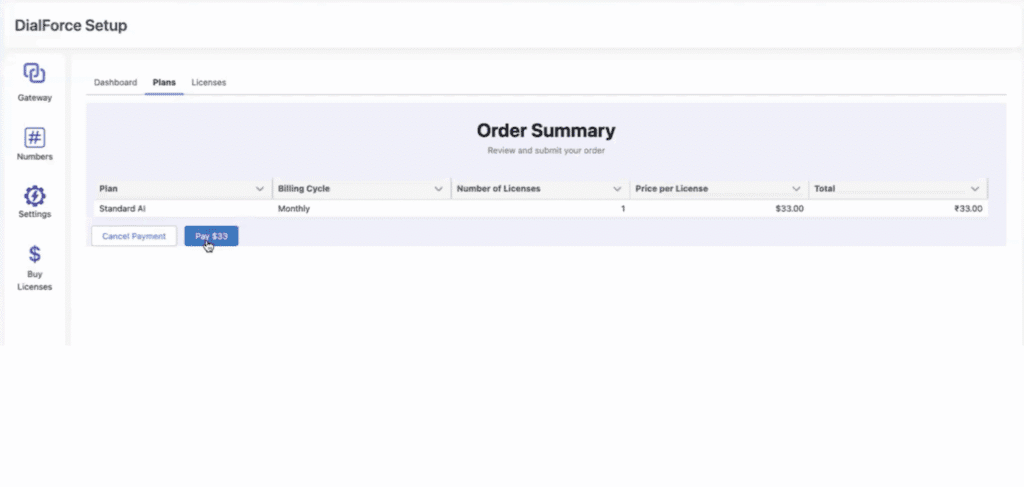
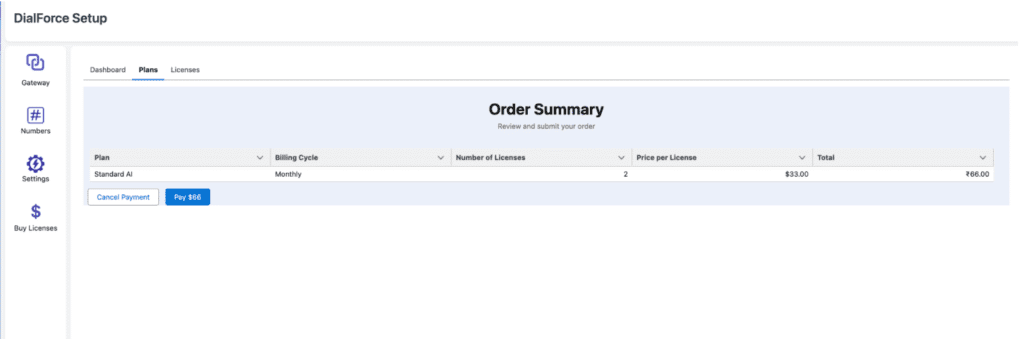
Step 3: Review order summary
- Once Stripe setup completes, an Order Summary appears showing plan details, total cost, and billing cycle.
- Carefully examine the information displayed.
- Click Pay to advance to payment processing.
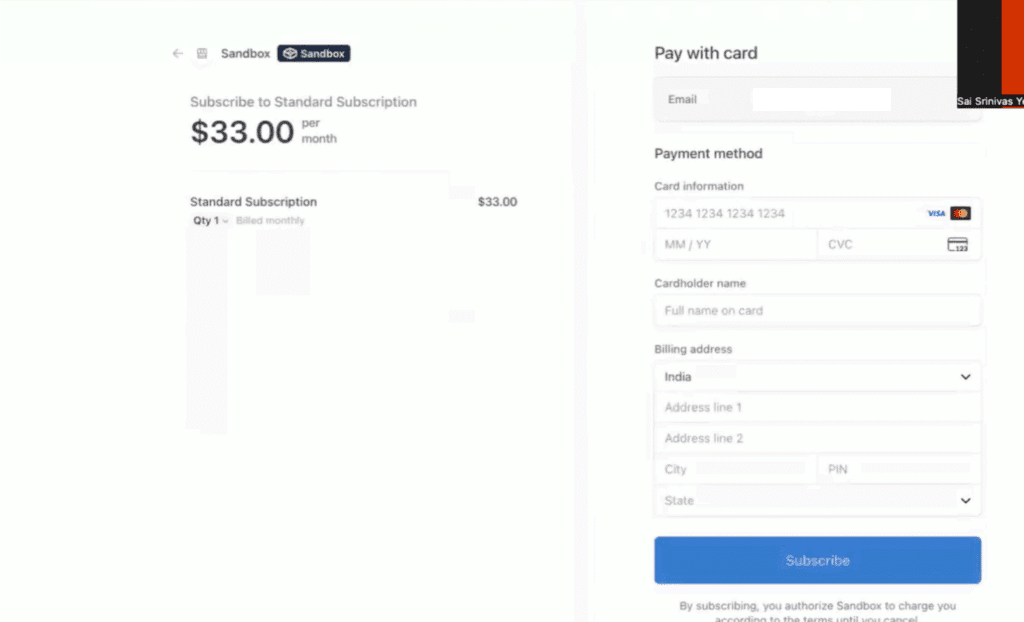
Step 4: Complete payment on Stripe
- You are redirected to the Stripe payment interface.
- Enter your payment information.
- Click Subscribe to finalize the transaction.
- The specified amount will be deducted from your account.
Step 5: After successful payment
- The system creates your subscription within Stripe.
- You automatically return to your organization’s page in the app.
- A confirmation screen displays your active subscription status.
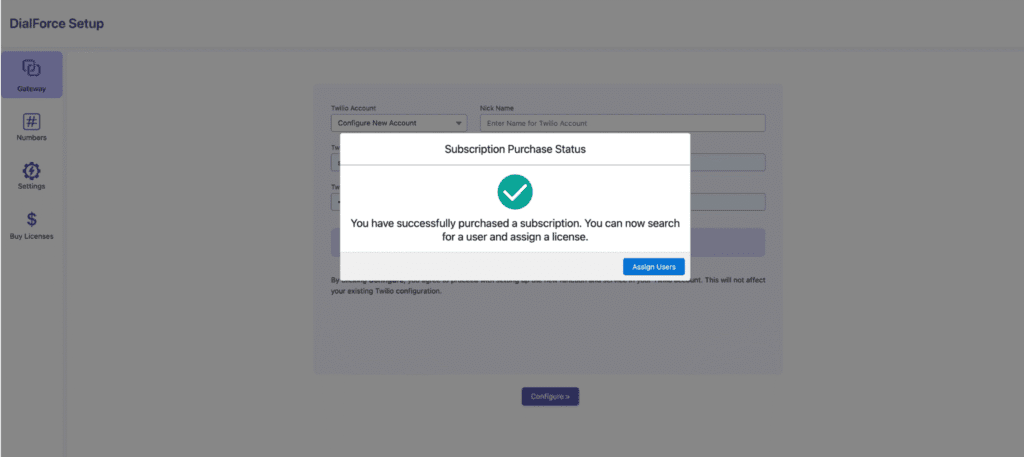
After selecting Assign users, the License Assignment window opens and continues with Step 6.
Step 6: Assign licenses
Following purchase, licenses can be distributed to users.
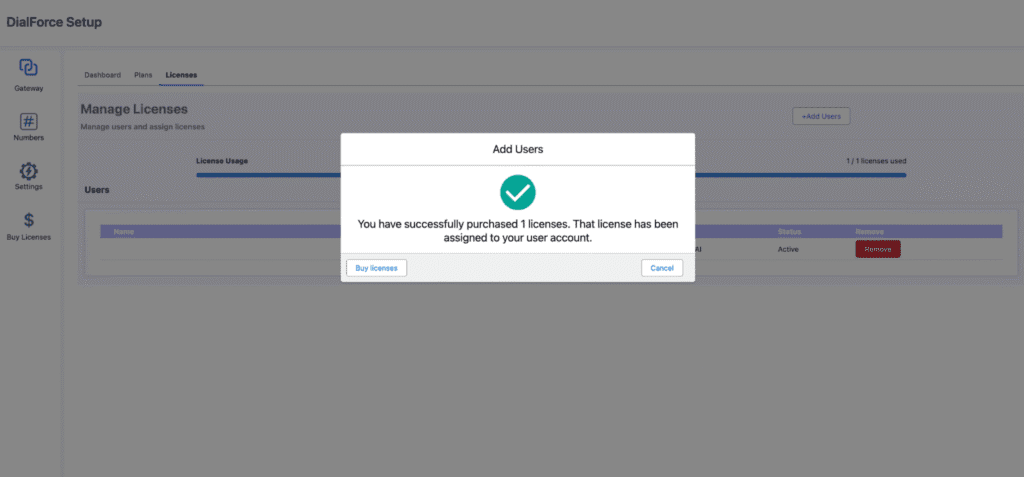
Case 1: Purchase
- First subscription with one license: that license automatically assigns to the logged-in user.
- First subscription with multiple licenses: one license automatically assigns to the logged-in user; remaining licenses trigger the assignment window below.
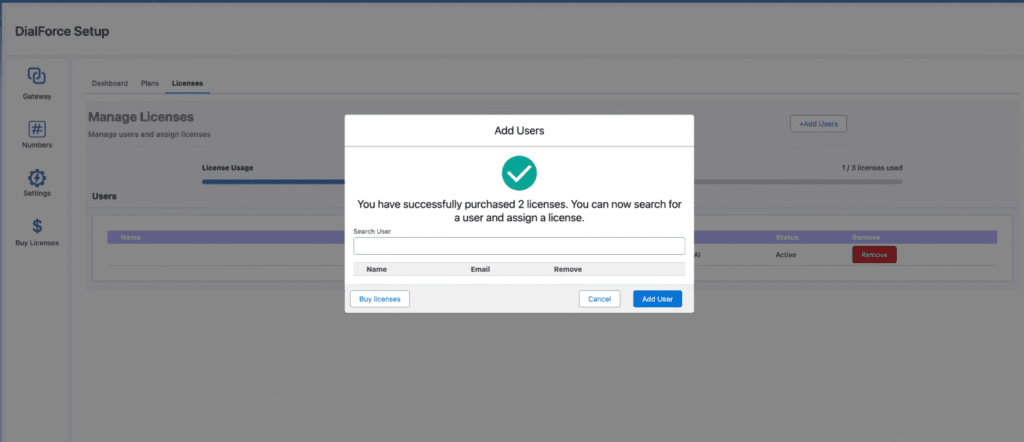
- In the Search User field, type the target user’s name.
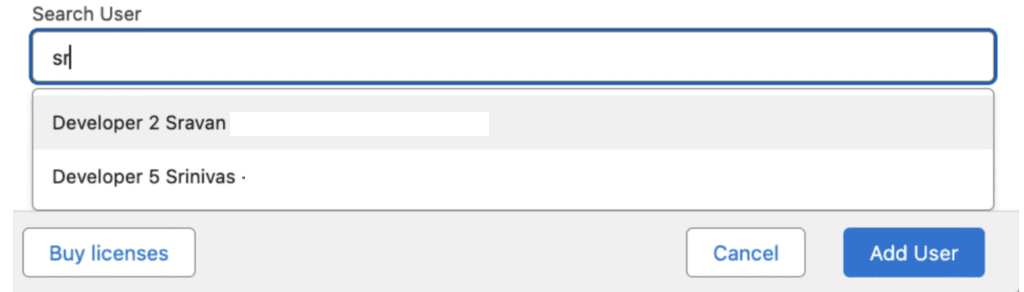
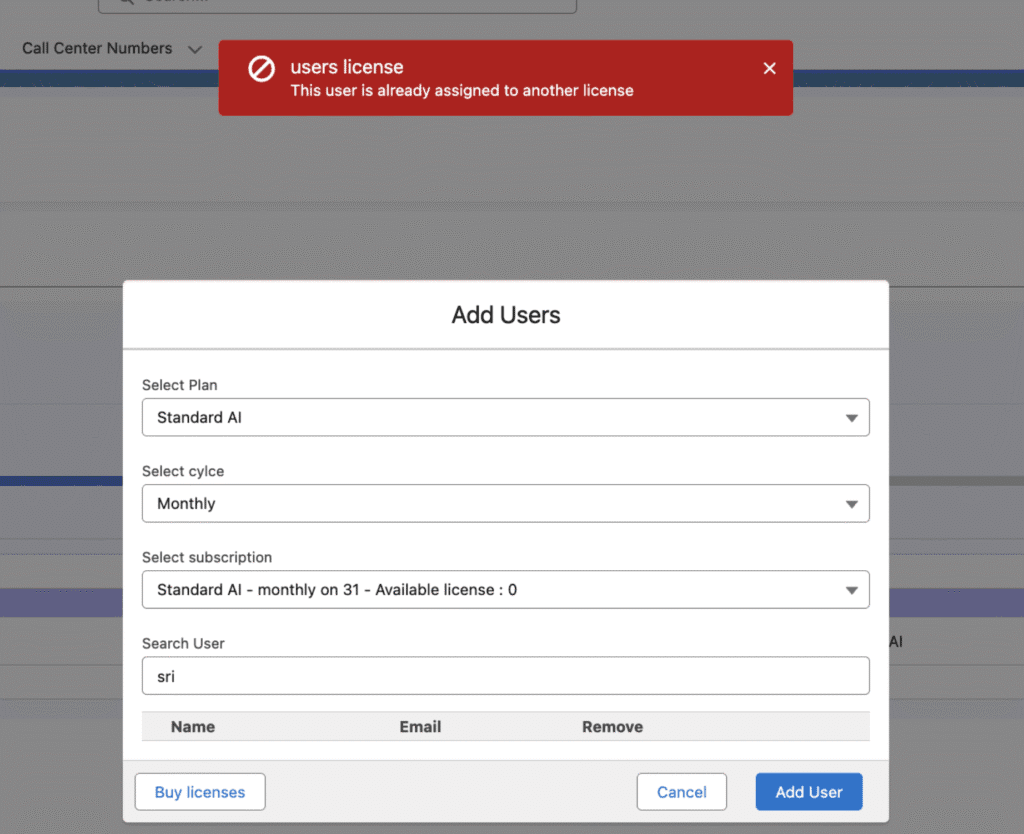
- Select the user from the appearing list. If the user already possesses an assigned license, an error message appears. If the user has no existing license, the system displays a confirmation.
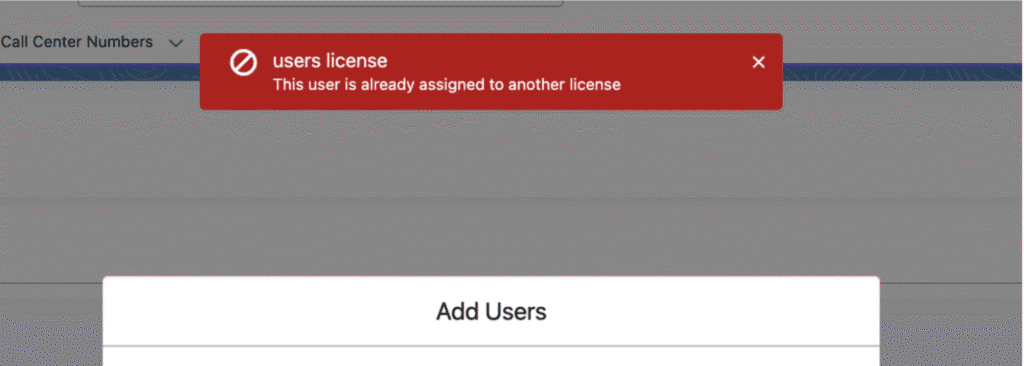
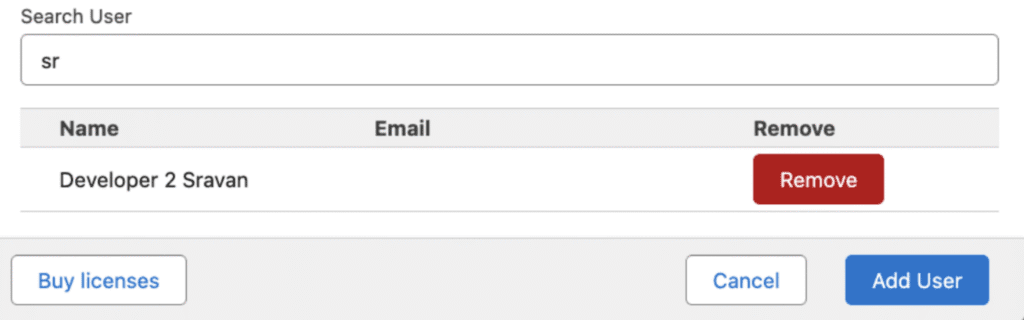
- Click Add User to finalize the assignment.
- Assigned users appear in the license list.
Case 2: Assigning licenses manually
- Click the Buy License icon from the left sidebar.
- Navigate to the Licenses tab.
- The License Assignment window opens.
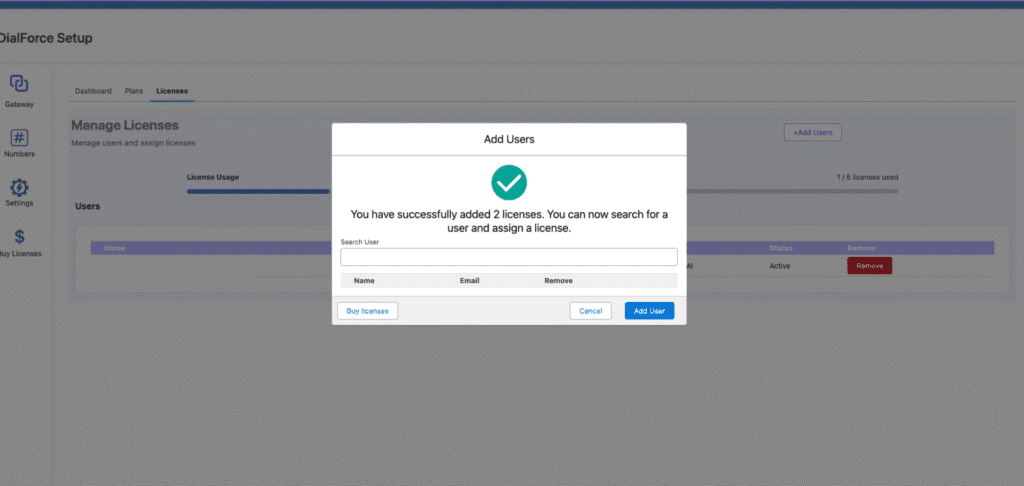
- Click Add Users.
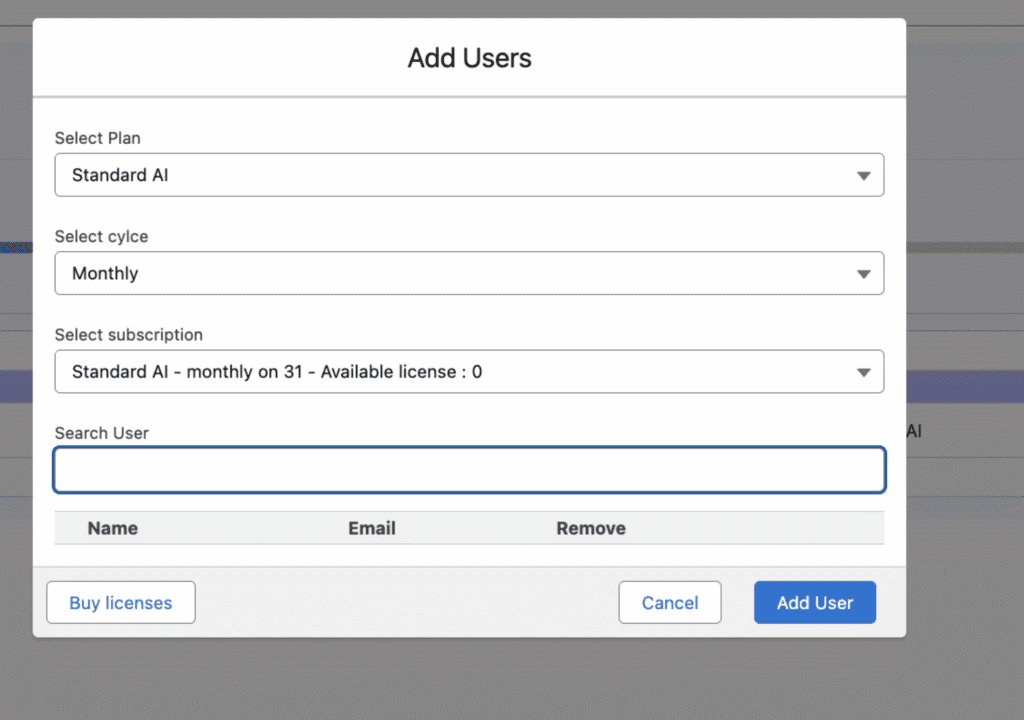
- Select:
- Plan.
- Cycle (Monthly/Yearly).
- Subscription from the list.
- In the Search User field, type the target user’s name.
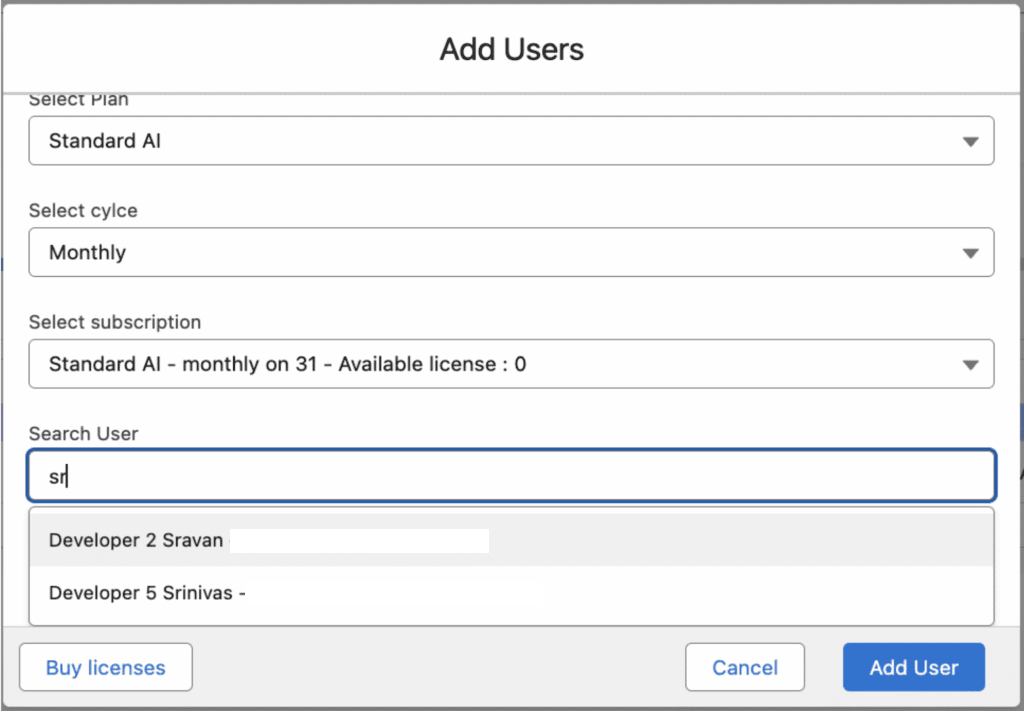
- Select the user from the displayed list. If the user already has an assigned license, an error message displays. If the user has no existing license, a confirmation appears.
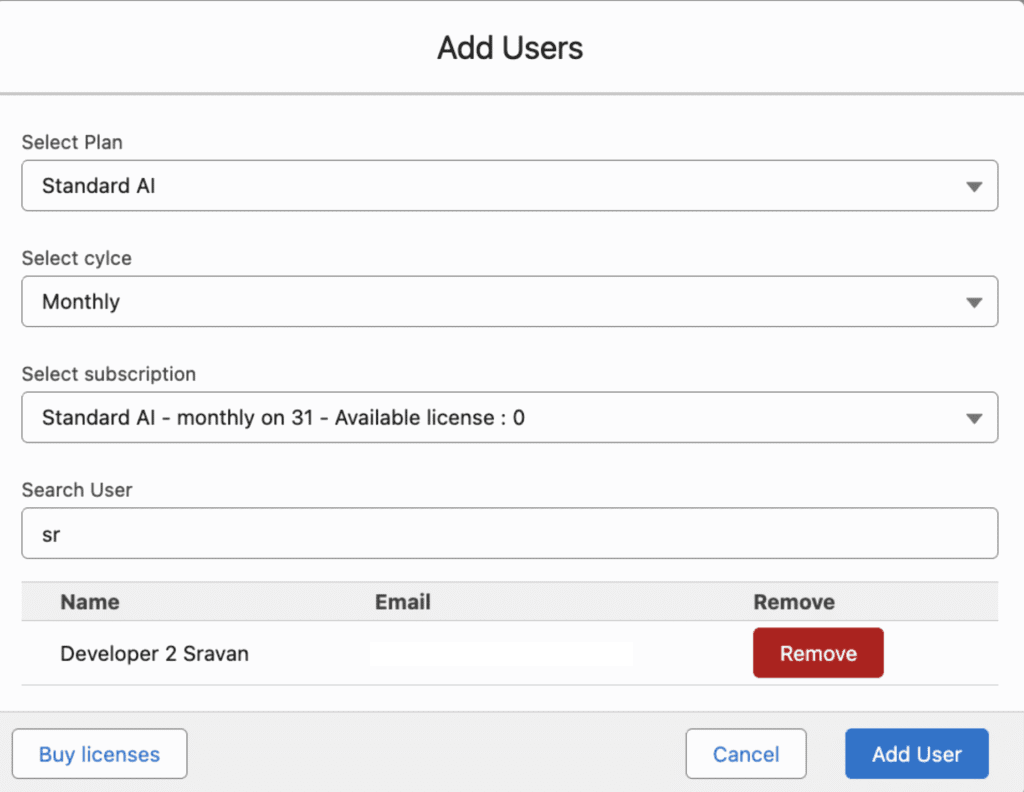
- Click Add User to complete the assignment.
- Assigned users now appear in the license list.
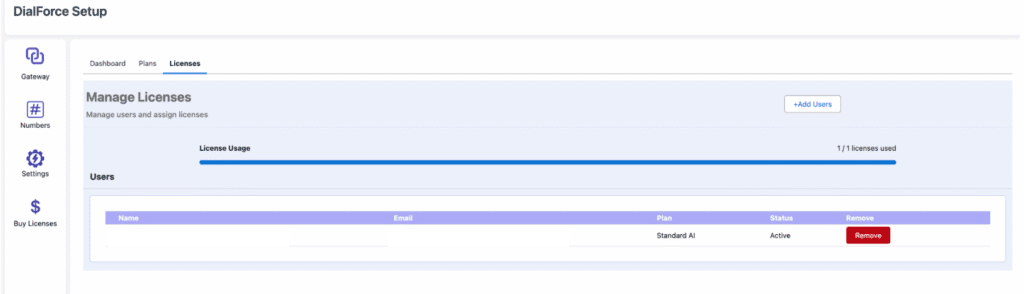
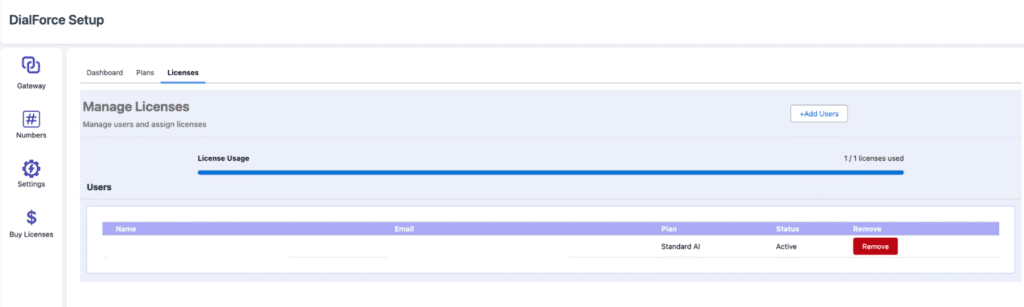
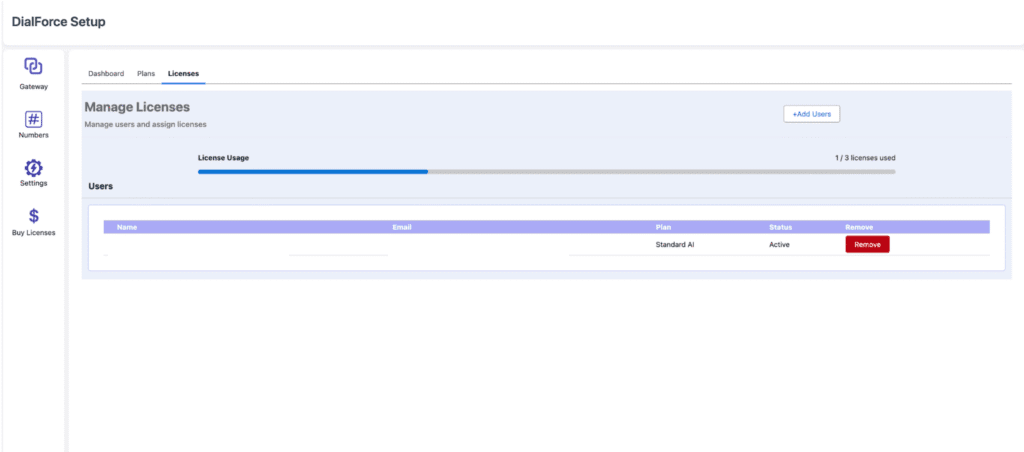
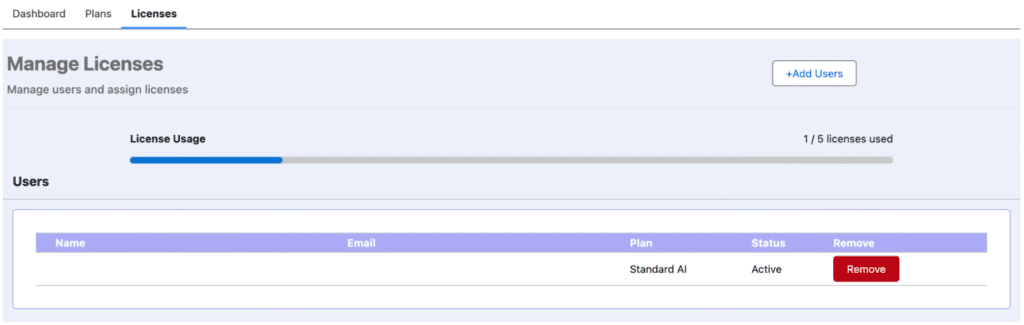
Step 7: View and manage licenses
- Access the Licenses Tab on the dashboard.
- View the following information:
- Total Licenses Purchased.
- Total Licenses Assigned.
- Available Licenses.
- To remove a license, click the Remove License button next to the user’s details.
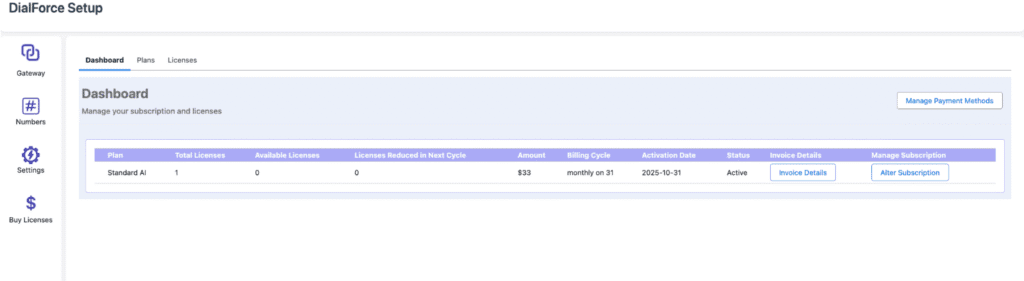
Step 8: View subscription details (Dashboard)
- Click the Buy License icon from the left sidebar.
- Navigate to the Dashboard tab.
- The Dashboard displays all active subscriptions with details.
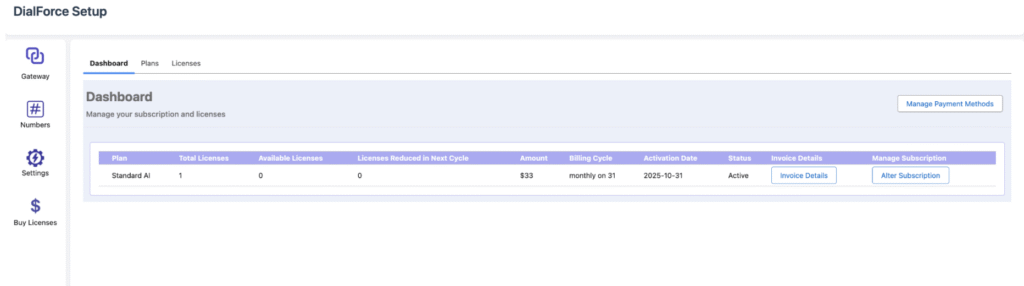
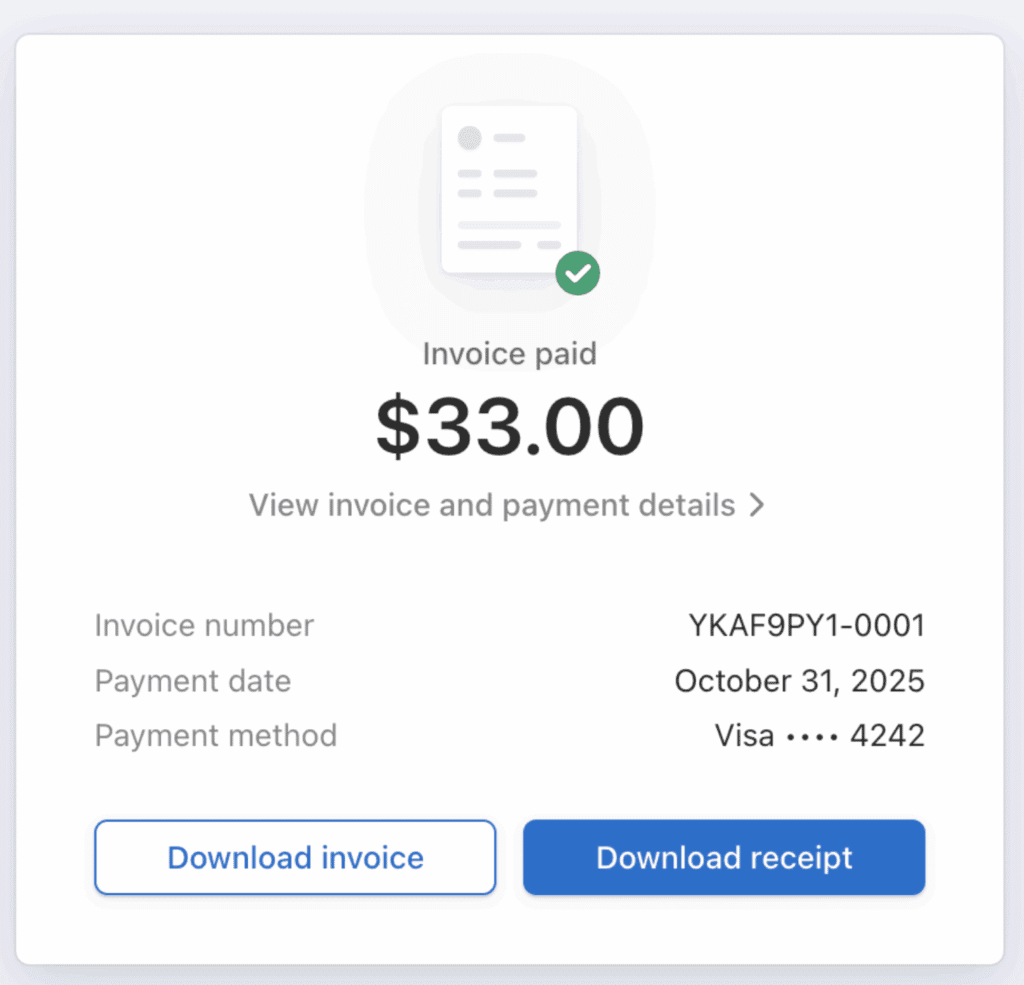
- To view an invoice, click Invoice Details for the desired subscription. The invoice displays.
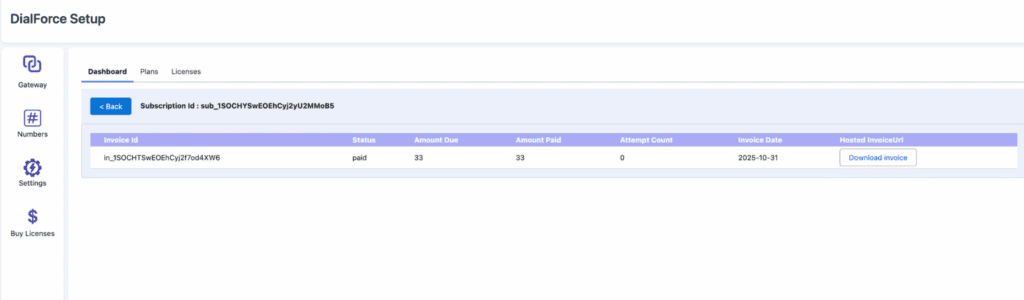
- To download it, click Download Invoice. The invoice downloads directly from Stripe.
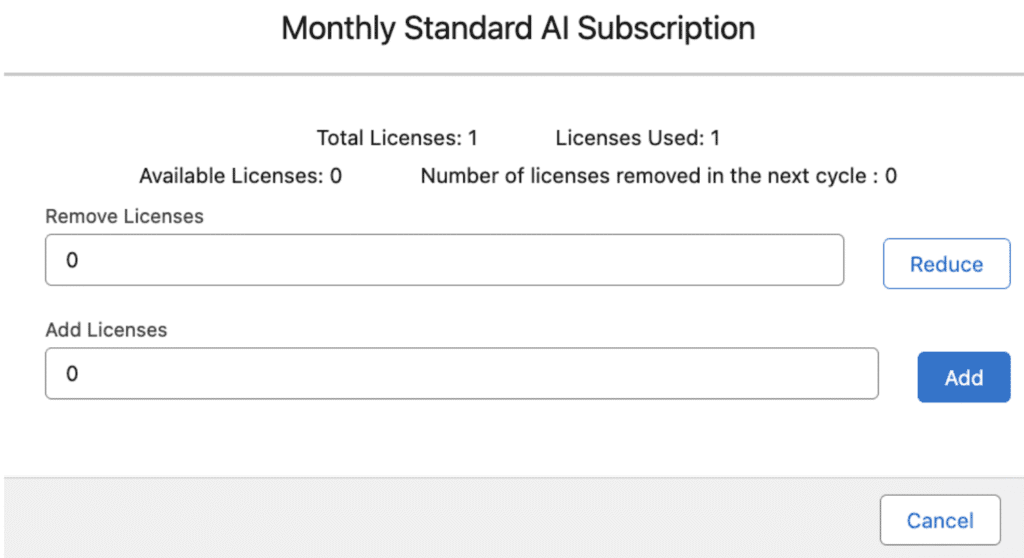
Step 9: Modify subscription (add/reduce licenses)
- Click the Alter Subscription button in the dashboard.
- A window appears allowing you to increase or decrease the number of licenses.
Important notes:
- License reduction: changes apply to the next payment cycle if more than 15 days remain before the next billing date.
- Short-term billing: if the next payment occurs within 15 days, changes apply in the following cycle.
- You can also increase licenses by entering quantities in the Add Licenses input box.
Step 10: Add more licenses to an existing subscription
- Go to the Plans Tab and click Buy Plan again.
- If an existing subscription already exists for that plan, the system automatically increases the license count for that subscription.
- Click Pay to confirm.
- Payment processes automatically using the existing Stripe payment method.
- After successful payment, a confirmation screen displays with the updated license count.
Step 11: Manage your Stripe account
- To view or manage your Stripe account, click the Manage Payment button on the dashboard.
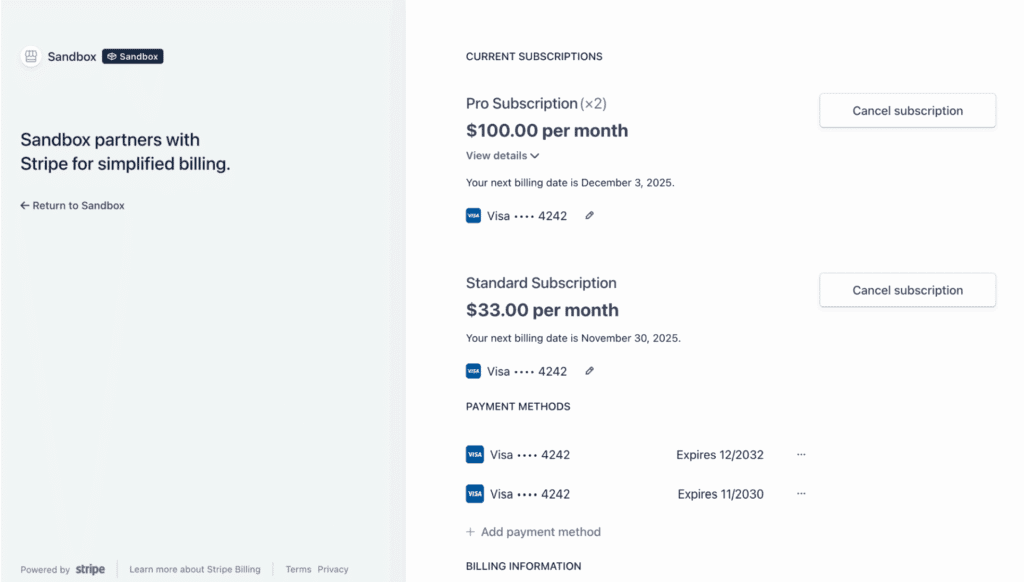
- You are redirected to your Stripe Customer Portal.
- Here, you can view:
- Subscription details.
- Payment history.
- Invoices.
- Billing information.